Wednesday, July 22, 2015

A Touch of Southern Elegance: Shrimp & Andouille Sausage with Red Pepper over Parmesan Polenta


Taking the turn to comfort foods of the south for today's dish was inspired by a friend of mine who came over for drinks last night. He kept using a fake accent and spoke of New Orleans as though he was getting ready to travel there... in fact, he is headed to New York today as I write this. Regardless, he was entertaining to watch as we all had one or two too many drinks!

Ahhhhh... good times with great friends.

I love Southern comfort foods, and what is more Southern than shrimp and grits? Taking a simplistic approach to making this dish makes it even more comforting... on your waistline! The fact that this dish only incorporates a few ingredients and is quick to get to the table makes this dish a perfect meal to serve when on a restricted time schedule.


Shrimp & Andouille Sausage with Red Pepper over Parmesan Polenta


Ingredients:
3 tablespoons olive oil
1/2 pound andouille sausage, sliced
24 peeled and deveined, large white shrimp
1 red bell pepper, sliced
Kosher salt and black pepper
4 tablespoons unsalted butter, divided
1 cup instant polenta
2 cups of water
1 1/2  cups of milk
1/2 teaspoon chopped fresh parsley
1/4 cup shredded parmesan
4 green onions, sliced, for garnish (optional)

Directions:
1. Heat the oil in a large skillet over medium-high heat. Cook the sausage and pepper until sausage is browned and pepper starts to soften, 3 to 4 minutes. Add the shrimp, 1/2 tsp salt, and 1/4 tsp pepper and cook. covered, until the shrimp are opaque. 3 to 4 minutes more. Add 2 tablespoons of the butter and cook until melted. Remove from heat and keep covered until ready to serve.

2. Meanwhile, in a medium saucepan, bring 2 cups of water to a boil. Whisk in the polenta and cook, whisking, until thickened, 3 to 4 minutes. Add in the milk and whisk until smooth. Whisk in the remaining 2 tablespoons of butter, 1/4 teaspoon salt, 1/8 teaspoon pepper, and parmesan. Serve with the shrimp mixture and sprinkle with the parsley and green onions. 


Presentation tip: To add the little extra flare to the dish's presentation, I left the tails of the shrimp on and skewered them after cooking. I layered the polenta on the bottom, topped with the red pepper and sausage, and garnished with green onion and parsley before placing the skewered shrimp over the top. For extra flavor, use the drippings from the pan you cooked the sausage mixture in and drizzle over the shrimp. Voila! 

If you like my recipes, come like me on Facebook @ Brandee's Basics. Thanks for stopping by!


Wednesday, July 15, 2015

How To: Eggs


Eggs are one of my favorite proteins to work with, however, they are NOT the easiest ingredient to make look appetizing on a plate. They are delicate by nature and easy to overcook. In this blog I am going to reveal a few of my cooking tips to get you on your way to serving the perfect egg. (Note: I use ceramic pans when using direct heat on eggs because of its non-stick properties, and a high grade stainless steel because of its even heat conduction when using a secondary heat cooking method.)

If at first you don't succeed, try again. Practice makes perfect with these little globes of liquid sunshine.


Round 1: Scrambled

This is thought to be the easiest preparation of eggs. But, getting eggs to be fluffy isn't so easy. The first trick to making fluffy scrambled eggs is to whisk the eggs in a separate container to incorporate a little bit of air into them. Some people add a splash of milk to their eggs, but I find that adding milk to my eggs makes them flat. The second tip to cooking eggs is to drizzle olive oil in the bottom of a hot sauté pan over medium low heat and not to overwork them while they cook. After pouring the eggs into the pan, let them sit until the bottom begins to set. Gently folding half of the mixture onto the other half helps to build the eggs up; similar to making an omelet. Refrain from breaking them apart until reday to serve. At this point, I like to season w additional salt and pepper and cover w cheese. Cover and let sit on a burner that's not in use, until ready to use.

Chipotle Sausage Breakfast Burritos


Ingredients 
4 large flour tortillas, warmed
4 large eggs
2 tbsp fresh pico de gallo salsa
1 lb turkey sausage
3 cloves garlic, minced
1/2 large white onion, diced
4 oz Mexican style shredded cheese
2-3 tbsp Tobasco Chipotle hot sauce, divided
salt and pepper

Directions 
1. Preheat medium sauté pan over medium low heat to scramble eggs. Preheat another medium sauté pan over medium heat to cook turkey sausage. 

2. Crack eggs into a mixing bowl. Add pico de gallo and season w salt, pepper, and a few dashes of tobasco. Whisk by hand until well combined, about 1 minute. (Tip: the more you whisk, the lighter in color the eggs will become because of incorporated air).

3. Chop onion and garlic. Add 2 tbsp olive oil to bottom of sauté pan on medium heat and sweat onion and garlic until almost translucent. Add in ground turkey, a few dashes of tobasco sauce, and cook through, about 8 minutes. Remove from heat.

4. While meat is cooking, generously add olive oil to bottom of sauté pan over medium low heat. Add in eggs, sprinkle w salt and pepper, and let sit until eggs begin to set. Gently fold over half of the mixture on top of the other half to start building layers. (Tip: Be careful not to overwork them or they will fall flat.) When eggs are almost fully set, remove from heat, add shredded cheese over the top, cover w lid and let set on a burner not in use.

5. Warm the tortillas slightly to make them more pliable, about 20-30 seconds each in the microwave. Evenly distribute sausage mixture to the middle of each tortilla. Cut scrambled eggs into 4 evenly portioned strip and add to tortillas. Dash tobasco over the mixture in each tortilla. Wrap each Tortilla into a burrito.

6. Place rolled burritos on a microwave safe plate and microwave for 45-60 seconds to thoroughly heat everything through. Cut each burrito on a slight bias and serve hot.

Makes 4 burritos.


Round 2: Pan Fried Eggs

The way it works with pan frying eggs to achieve doneness is by the number of flips it goes through in the pan. 

0- for sunny side up
1- for over easy
2- for over medium
3- for hard set

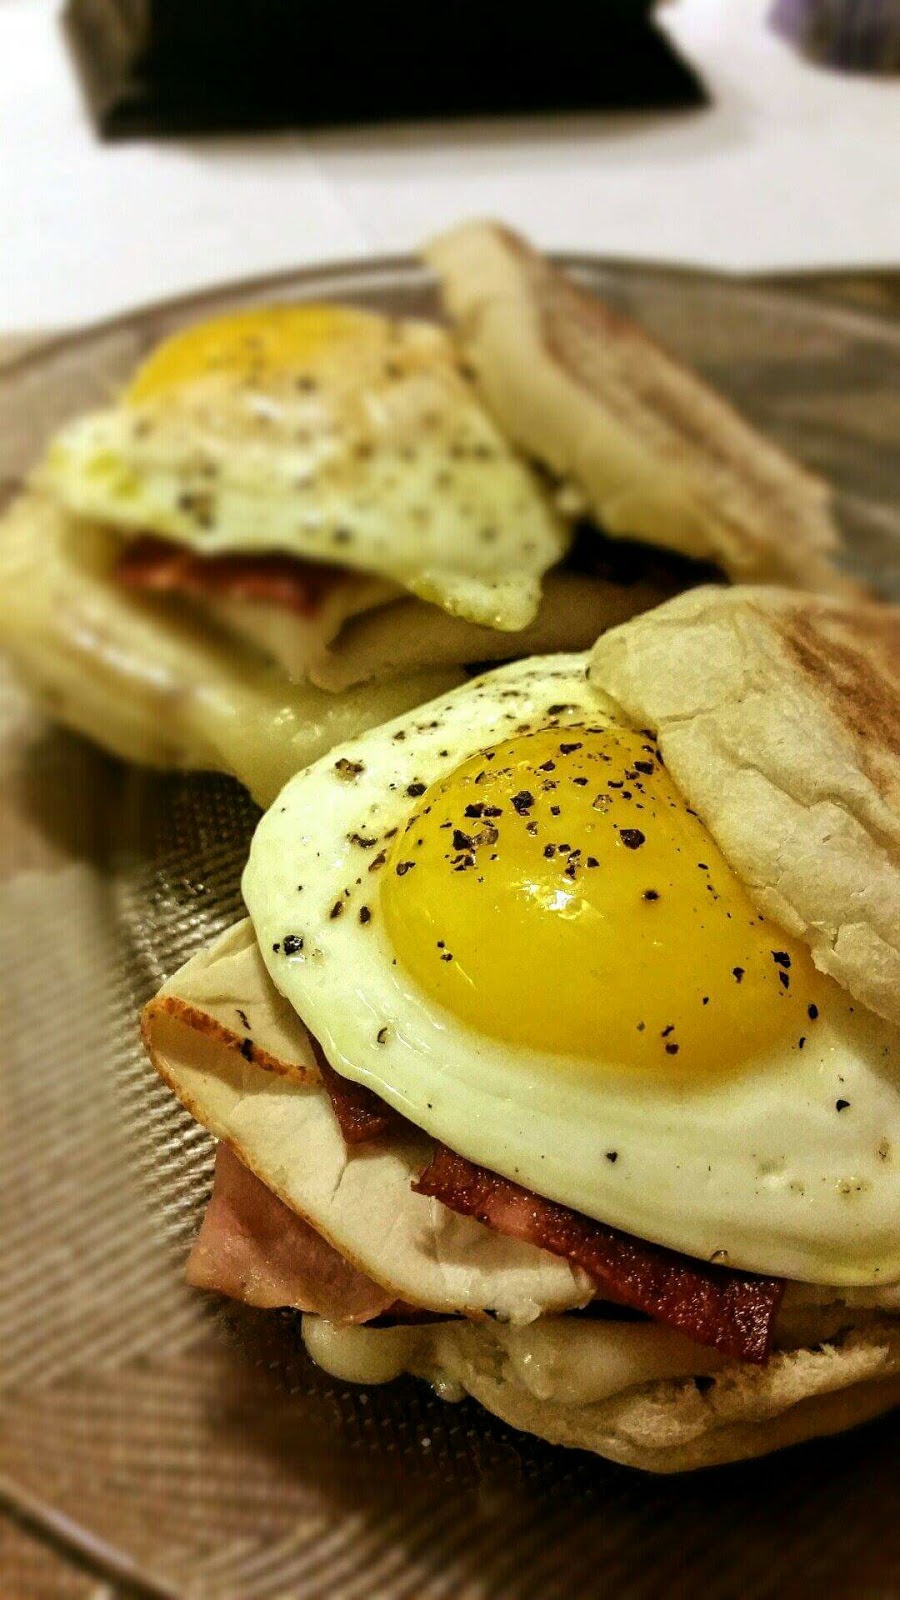
I have a slightly different approach to pan frying eggs. Because of eggs' very delicate nature, trying to flip eggs that are in the first stages of cooking, they are too easily broken... so again, I take the stance of not overworking the egg while it cooks. Using a generous amount of olive oil in the pan before adding eggs helps the egg to not stick to the pan while cooking, and makes it easier to remove from the pan when done cooking. I also crack the individual eggs into small ramekins to make sure yolk doesn't bust upon adding to the pan. Lastly, I let the egg white cook longer, on lower heat, before attempting to flip. I rarely flip my eggs though because I enjoy the saucy element that an egg yolk adds to my dishes. Just like how I cook them in this next recipe:

Chicken Cordon Bleu Club Breakfast Muffin


Ingredients
2 Thomas' English Muffins, cut in half
2 large eggs
2 slices sweet deli ham
2 slices roasted deli chicken
2 slices swiss cheese
2 slices bacon, cooked
2-3 tbsp honey mustard
olive oil

Directions
1. Preheat 2 medium sauté pans, one over low medium heat, the other over medium heat. Cook bacon in sauté pan over medium heat until crispy. Drain on paper towels until ready to use. Cut muffins, and stack lunch meats and cheese into 2 sandwich settings.

2. Break eggs into individual ramekins. Drizzle pan w olive oil and carefully add eggs in, one at a time, on opposite sides of the pan, being careful not to have them run together. Let them set. Eggs are done when the egg whites are completely opaque.

3. While eggs are cooking, on a microwave safe plate, heat the lunch meat and cheese stacks until cheese is melted, about 45 seconds. Toast muffin halves in the toaster.

4. Divide honey mustard to the bottom rounds of the muffin. Top w heated meat and cheese stacks, bacon, and lastly the egg. Season w salt and pepper and loosely lay top muffin round on sandwhich. Serve immediately. 

Makes 2 sandwiches


Round 3: Poached Eggs

This is possibly the silkiest, most delicate, and sexiest egg that can be presented on a plate. It seems daunting to try and cook a poached egg, but, let me assure you, with a few pointers and a little bit of practice, cooking an egg using this method becomes a piece of cake (won't literally turn them into "cake", but you understand what I mean!). Only tips you need to remember is to use simmering, not boiling, water, add white vinegar to aid in the coagulation process, and be mindful not to overcook them. Easy peasy. Here's a great recipe that I make often for brunch gatherings:

Asparagus with Poached Eggs 


Ingredients:
8 oz Asparagus, ends cut
2 tbsp butter
Juice of half a lemon
2 large eggs
6 cups simmering water
1/2 cup white vinegar
salt and pepper

Directions:
Preheat a saute pan over medium heat on the stove. Also, preheat 6 cups of water and vinegar in a pot on the stove.

melt butter in the saute pan and add asparagus. Season with salt and pepper. Cover and cook over medium heat for 5-7 minutes.

Crack eggs into individual ramekins. Wait for water to come to a simmer before lowering eggs into the water. Create a cyclone in the water to keep the eggs from settling on the bottom of the pan and sticking. Cook for 2-3 minutes, until egg whites are opaque. drain on a paper towel. Season with salt and pepper.

Lay out asparagus on a plate. Squeeze lemon juice over asparagus and then top with poached egg. Serve warm.


For our finale, we're going to break out the classic recipes for hard boiling our eggs. These are recipes that just about everyone grew up with. My mom made these for my siblings and I after Easter, since we had a boat load of dyed eggs left after the holidays, but, these are great for any occasion.


Classic Deviled Eggs


Ingredients


6 eggs

1/4 cup mayonnaise

1 teaspoon white vinegar

1 teaspoon yellow mustard

1/8 teaspoon salt

Freshly ground black pepper

Smoked Spanish paprika, for garnish


Directions
1. Take eggs out of the refrigerator 15-20 minutes before starting to cook. Bring about 6 cups of water to a boil in a medium sauce pan. Carefully lower eggs into the boiling water (tip: a ladle works well for this) and boil on medium high heat for 15 minutes. Remove from heat and drain. Transfer eggs to a large bowl and fill with cold water to stop the cooking process. 


2. Crack egg shells and carefully peel under cool running water. Gently dry with paper towels. Slice the eggs in half lengthwise, removing yolks to a medium bowl, and placing the whites on a serving platter. Mash the yolks into a fine crumble using a fork. Add mayonnaise, vinegar, mustard, salt, and pepper, and mix well.


3. Evenly disperse heaping teaspoons of the yolk mixture into the egg whites. Sprinkle with paprika and serve. Tip: place the yolk mixture into a Ziplock sandwich bag and cut a small piece of the corner off of the bag to pipe mixture into the eggs.


Classic Egg SaladPrep: 15 minutes + chilling 


Ingredients


¼ cup mayonnaise

2 teaspoons lemon juice

1 teaspoon dried minced onion

¼ teaspoon salt

¼ teaspoon pepper

6 hard-cooked eggs, chopped

½ cup finely chopped celery


Directions

1. Take eggs out of the refrigerator 15- 20 minutes before starting to cook. Bring about 6 cups of water to a boil in a medium sauce pan. Carefully lower eggs into the boiling water (tip: a ladle works well for this) and boil on medium high heat for 15 minutes. Remove from heat and drain. Transfer eggs to a large bowl and fill with cold water to stop the cooking process. 


2. In a large bowl, combine the mayonnaise, lemon juice, onion, salt and pepper. Stir in eggs and celery. Cover and refrigerate. 


Yield: 3 servings. Recipe can be doubled to make larger batches at once.


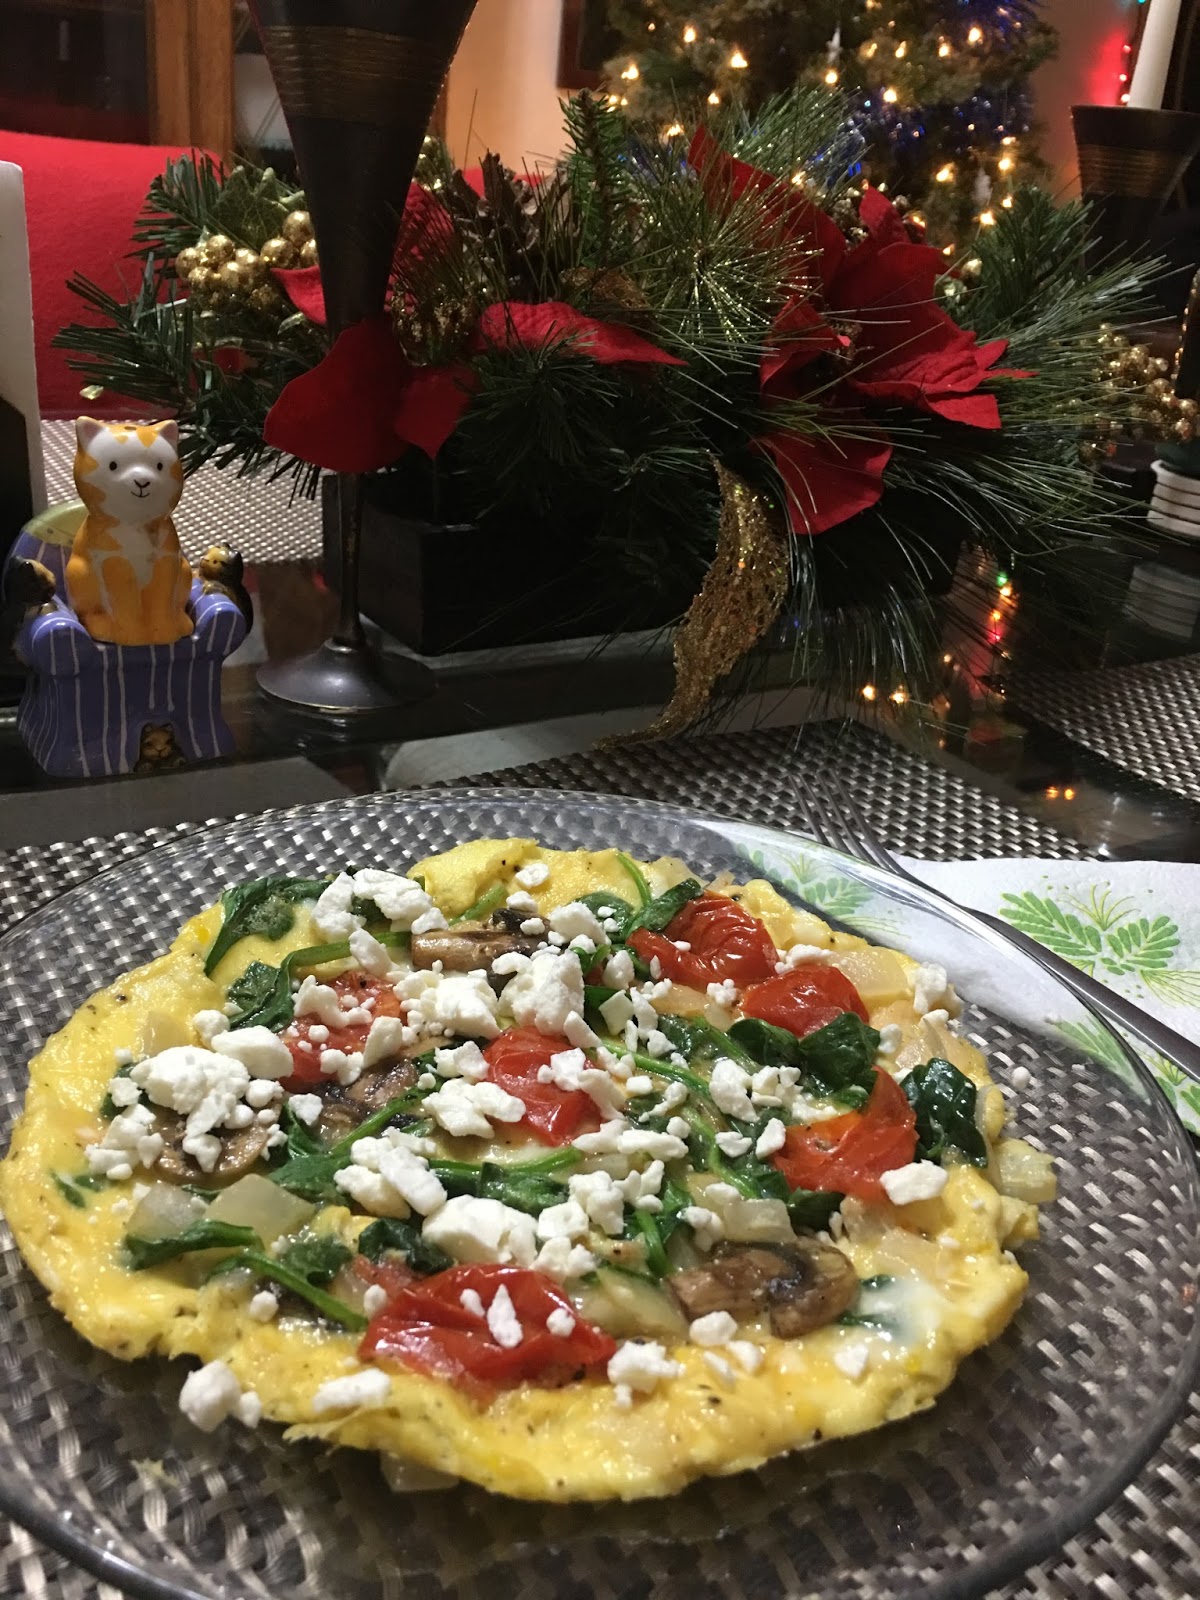
Garden Frittata

Ingredients:
3 large eggs
2-3 tablespoons milk
3 cherry tomatoes, sliced in half and seeded
1/4 cup diced onions 
1/2 cup packed fresh spinach leaves
1/2 cup chopped white mushrooms 
Olive oil
Salt and pepper
Feta cheese for garnish (optional)

Directions:
1. Preheat a medium non stick sauté pan over medium heat. Drizzle olive oil in the pan and evenly coat the bottom of the pan. Add the tomatoes, onions, and mushrooms. Sprinkle with salt and pepper. Cook for 2-3 minutes then add the spinach leaves. 

2. In the meantime, crack the eggs into a dish and add the milk. Add salt and pepper to taste and scramble eggs in the bowl. Pour egg mixture evenly over the veggies in the pan. Lower the heat to medium low. 

3. Cook without stirring until the eggs begin to set. To get eggs to cook evenly, move the edges of the frittata away from the pan and allow liquid egg to fill its place. Continue cooking until eggs are set, about 3-4 minutes.

4. To plate: frittata should slide out of the pan easily onto the plate. Garnish with feta cheese if desired and serve immediately. Serves 1.

Enjoy!


If you like my recipes, like me on Facebook @ Brandee's Basics. Thanks for stopping by! 

Flatbreads: Quick & Easy


There are plenty of times where I'm too busy, or not in the mood, to get in the kitchen to cook an all out meal for myself or for my fiancé. These flatbreads are an ingenious way to get the look and taste of tasty food without slaving over a hot stove. I look at flatbreads as being like a gourmet sandwich... possibly with fewer calories too.


These little flatbread gems, by Flatout brand, are popping up in grocery stores everywhere. I find them on special at my local Publix as buy one get one free often. I pick up a few of these deals and freeze them so that I always have them on hand. The Spicy Italian is our favorite. (If you haven't noticed yet from my recipes, I like to add spice to my dishes... not an overly hot, burn your tongue off kind of spice... just a little nice, even heat.) 

So, I hope you enjoy these recipes that we use regularly in our home and I hope you get inspired to create your own favorite flavor profiles for flatbreads.


Spicy Hawaiian Flatbread 

Ingredients
1 Flatout brand Spicy Italian flatbread
1 slice deli ham, cut into pieces
1/4 cup pineapple tidbits 
3 slices pickled jalapeño, seeded and chopped
1 tbsp crushed red pepper flakes
3 tsp pizza sauce
1/2 cup shredded mozzarella
Olive oil

Directions
Preheat oven to 375*. Drizzle olive oil on flatbread and bake flatbread on a cookie sheet in the middle of the oven for 5 minutes. 

Cover Flatbread w sauce and then layer the cheese, ham, pineapple, and jalapeño. Top w a little bit more cheese and sprinkle w crushed red pepper.

Bake for another 5-6 minutes and then broil on high for 2 minutes until cheese bubbles and edges of Flatbread turn golden brown. Cut and serve immediately.


Garlic Caprese Flatbread

Ingredients
1 Flatout brand Spicy Italian flatbread
1 clove roasted garlic, finely minced
6 leaves fresh basil, minced and divided in half
3 tsp pizza sauce
5 slices tomato slices, thin
4 slices fresh mozzarella, thin
Olive oil

Directions
Preheat oven to 375*. Drizzle olive oil on flatbread and bake flatbread on a cookie sheet for 5 minutes.

In a small microwaveable bowl, mix sauce, 1/2 of the basil, and roasted garlic and microwave for 30 seconds.

After par baking the crust, smother heated sauce mixture evenly on the flatbread, then place tomatoes and then mozzarella on as well. Bake for another 5-6 minutes. Broil on high for 2 minutes until cheese gets bubbly and melted. Sprinkle w remaining basil. Cut and serve immediately.

Tuesday, July 14, 2015

Little Puffs of Deliciousness


This is one of those guilty pleasures that I can't stay away from. After you try these once, you will understand exactly what I mean. There have been times where I've made my own pie filling to use as the topping for these, but its much quicker to buy the canned pie filling at the store. Get creative with how you stuff these, as blueberries, cherries, and raspberries will pair very well in these recipes too. Be very wary though, these things are addictive!


Apple Pie Puffers 

Ingredients:

1 tube (8 count) refrigerated cinnamon rolls
2 apples, peeled and cored, cut into 16 chunks
1/4 cup water 
1 tbsp lemon juice
pinch of ground cinnamon 
1 can apple pie filling
Whipped cream for topping (optional)

Directions:

1. In a covered saucepan, over medium heat, simmer fruit chunks in water, lemon juice, and cinnamon until softened, about 5-7 minutes. Drain and let cool before handling. In a small saucepan, warm pie filling on low heat until heated through. 

2. If baking: preheat oven to 375°; if frying: preheat fryer to 325°. Open canned cinnamon rolls and separate. Cut each piece of dough in half. On a lightly floured surface, roll each dough ball half into a ball and press into a flat round. 

3. Put one fruit chunk in the center of each round and seal dough around it. (If baking: t's ok if they don't seal all the way. If frying, they need to be completely sealed to avoid splattering in the oil)

4. Baking directions: transfer puffers to baking sheet and bake for 10-11 minutes, or until dough is puffed and a light golden brown. 

5. Frying directions: being careful not to overcrowd the basket, fry Puffers for 3-4 minutes each, until puffed and golden brown, helping Puffers to rotate in the oil to evenly cook. Let finished puffers drain on paper towels.

6. Place Puffers in a small dessert serving dish, top with heated pie filling and whipped cream (optional) , and serve warm.


Peach Cobbler Puffers 

Ingredients:

1 tube (8 count) refrigerated cinnamon rolls
2 peaches, pitted, cut into 16 chunks
1/4 cup water 
1 tbsp lemon juice
pinch of ground cinnamon 
1 can apple pie filling
Whipped cream for topping (optional)

Directions:

1. In a covered saucepan, over medium heat, simmer fruit chunks in water, lemon juice, and cinnamon until softened, about 5-7 minutes. Drain and let cool before handling. In a small saucepan, warm pie filling on low heat until heated through. 

2. If baking: preheat oven to 375°; if frying: preheat fryer to 325°. Open canned cinnamon rolls and separate. Cut each piece of dough in half. On a lightly floured surface, roll each dough ball half into a ball and press into a flat round. 

3. Put one fruit chunk in the center of each round and seal dough around it. (If baking: t's ok if they don't seal all the way. If frying, they need to be completely sealed to avoid splattering in the oil)

4. Baking directions: transfer puffers to baking sheet and bake for 10-11 minutes, or until dough is puffed and a light golden brown. 

5. Frying directions: being careful not to overcrowd the basket, fry Puffers for 3-4 minutes each, until puffed and golden brown, helping Puffers to rotate in the oil to evenly cook. Let finished puffers drain on paper towels.

6. Place Puffers in a small dessert serving dish, top with heated pie filling and whipped cream (optional) , and serve warm.

Chicken Enchilada Mac n Cheese


Chicken Enchilada Mac n Cheese

Prep time: 20 minutes 
Cook time: 50 minutes 
Ready in: 1 hour 10 minutes 
Serves: 12

Ingredients
16 oz box medium shells pasta, cooked and drained 
2 pan fried chicken breast, cubed
6 cloves garlic, minced, divided in half
1 large white onion, chopped
2 cans diced green chili’s, half drained
8 oz cream cheese, softened
cornstarch slurry ( ½ cup cornstarch mixed with ½ cup cold water)
¼ cup butter 
¼ cup olive oil
4 cups 2% milk, room temperature 
2 cups water
2 chicken bouillon cubes
Salt and pepper
Olive oil for sautéing veggies
Mexican blend shredded cheese for garnish 
Sliced black olives for garnish (optional)
Fresh parsley leaves for garnish (optional)

Directions
1. Boil 6 cups salted water and cook pasta according to package direction. Drain and set aside.

2. Season chicken breasts w salt and pepper. Cook chicken in a sauté pan, over medium heat until cooked through, about 4-5 minutes on each side. Let rest for 5 minutes before chopping into cubes. 

3. In the same sauté pan, Drizzle a few tbsp olive oil and sauté ½ of the garlic and onion until translucent, 5-7 minutes. Add cubed chicken to veggies, cover and set aside. Mix 3 cups of hot water w the bouillon cubes, microwave for 2 minutes, stir to completely dissolve cubes, set aside. Make cornstarch slurry, set aside.

4. In a large pot, melt butter and ¼ cup olive oil w the other ½ of the garlic over medium heat. Slowly stir in cornstarch slurry until well combined and slightly thickened, 1 to 2 minutes. Slowly stream 4 cups of milk into pot, whisking constantly to incorporate ingredients thoroughly. Increase heat to medium high, bring to a low boil, and whisk until mixture begins to thicken, about 15 minutes. 

5. Add softened cream cheese and stir until completely melted. (Use an immersion blender to achieve a smooth texture.) Slowly stream in the bouillon mixture until desired consistency is achieved. (Tip: use less than the full 2 cups for a thicker sauce). Bring back to a low boil. Let simmer 5 minutes.

6. Add in green chilis, veggie mixture, and chicken. Add in the pasta last. Remove from heat.

7. Garnish w shredded cheese, olives (optional), and parsley  (optional) and serve immediately. 

Sunday, July 12, 2015

Salsapalooza

To Dip... Or Not To Dip?


If you're anything like my fiancé and I, we love our chips and dip. I am forever making salsas to keep in our fridge, and just like chili, salsa is a versatile ingredient to use in other dishes. We'll touch on that more in a little bit.


Let's take a look at some of the ingredients and cooking techniques that can be used in making a plethora of different salsas. Depending on the flavor profiles that are being created, there is going to be the need of different bases and cooking techniques to be used to create each one. For the recipes that I am giving out today, we are going to be working with a tomato base for 3 recipes, and a yogurt base for 1. We will be using an easy roasting method to help enhance the flavors of some tomatoes, garlic, tomatillos, and pablano peppers. It's very easy to do, and oh man, is it delicious!


This first recipe is an all-time favorite of mine. This is one of those recipes that can be served as a dip, used as a filling for enchiladas, or fried in eggroll wrappers. Although versatile in application, it's a snap to prepare and adds a delicious southwestern flare to dishes.

Southwestern Salsa

Ingredients:

2 cups tomatoes, diced
1 cup white onion, diced
1 15oz can corn, drained and rinsed
1 15oz can black beans, drained and rinsed
1 jalapeno, finely minced
2 tbsp cilantro, chopped
1 tbsp salt
1/2 tbsp cumin
1/2 tbsp chili powder
1 tsp cane sugar
1 tbsp lime juice

Directions:

1. Add tomatoes, onion, jalapeno, cilantro, and lime juice to a food processor. Pulse 5-7 times to break down ingredients into smaller, but still chunky pieces. Transfer ingredients into a medium bowl.

2. In a small bowl, add the spices together and stir to mix them together. Add the beans and corn to pulsed ingredients, as well as the spices and fold gently to thoroughly incorporate.

3. Refrigerate for at least one hour to chill through. Serve. 

Keep unused salsa covered and refrigerated. Use salsa within 5 days.


Next on our list of salsas is the Roasted Tomato and Pablano Salsa. This recipe calls for a few more ingredients that may not be on hand normally in your kitchen, and it is slightly more labor intensive to make. But, the end result is definitely worth it! 

Roasted Tomato Pablano Salsa

Ingredients:

2 lbs tomatoes (about 3 large)
1 large pablano chili pepper
1 jalapeno
3/4 cup white onion, diced
1/3 cup cilantro, chopped
Juice of 1 1/2 limes
1/2 tsp cane sugar
Sea salt, freshly ground pepper to taste
olive oil

Directions:

1. Preheat the oven to 500* F and lightly coat a large baking sheet with olive oil and sprinkle with salt. Set aside.

2. Using a paring knife, hull the tomatoes and cut "X's" on the back of the skins. (Only cut enough to pierce the skin) Place the tomatoes flat side down on the baking sheet. Cut the jalapeno and pablano pepper in half and remove the seeds. Place them round side up on the baking sheet with the tomatoes. Finally, lightly coat the diced onions with olive oil and place them in a flat layer on the baking sheet as well. Bake in the 500* oven for about 15 minutes, or until the skin starts to pull away on the tomatoes and a char starts to set in on the other veggies.

3. Remove roasted veggies from the oven and let sit for 5 minutes before handling. Slip the skins off each half of the tomatoes and peppers. Dice the skinned tomatoes and peppers. 

4. Add all ingredients to a medium mixing bowl with lime juice, cilantro, and seasonings and gently fold to incorporate. Add any bits on the baling sheet to the mixing bowl as well for added flavor.

5. Cover and refrigerate until chilled about 2 hours. Serve.

Tip: This salsa is incredible mixed in with scrambled eggs and for a salsa topping for nachos!


This next one is made with one of my favorite ingredients, TOMATILLOS! I remember the first time I saw one of these, I was so curious as to what it was. It looked and felt like an unripened, green tomato with a papery skin like an onion. It was strange. To top it off, when you take that papery skin off, it has a sticky feel to it. But, tomatillos are an awesome ingredient to use in salsas because of their mild, yet acidic, offerings.

Fire Roasted Tomatillo and Corn Salsa

Ingredients:

5-6 large tomatillos
2 ears of corn
2 medium heirloom tomatoes
2 jalapeno peppers
1 small bulb of garlic
juice of 1 lime
1/2 cup fresh cilantro leaves, chopped
salt and pepper to taste

Directions:

1. Set the oven to broil.

2. Cut the top end of the bulb of garlic and drizzle with olive oil. Wrap loosely in foil and put in the oven on the middle rack.

3. Remove the papery husks from the tomatillos and give them a rinse. Cut the stems off the jalapenos.

4. Put the whole uncut veggies under the broiler until they starts to blacken and release their juices. Watch carefully because this will not take long, about 10 minutes.

5. Carefully transfer the veggies, minus the corn, and any juices to the food processor. Check the garlic, when it is browned and soft, it's ready. Squeeze the garlic out of the peel and drop into the processor. Cut the corn kernels off the cob. (hint: turn a small bowl upside down in a larger bowl to create a perch for the corn stalk. Cut the kernels away from the cob and they will gather in the bottom of the larger bowl and reduce any mess).

6. Pulse the machine several times and then run briefly. You're looking for a uniform texture, but not a puree. 

7. Season with lime juice, and salt and pepper to taste. Stir in the cilantro, and corn kernels and cover tightly,and refrigerate until chilled through before serving, about 2 hours. Taste before serving to check seasonings as more salt and pepper may be needed.

This recipe was adapted from The View From Great Island


So far we have touched up on savory southwestern salsas, but for the finale we are going to fly across the ocean to the Greek Isles. This is another one of my favorite dips because it, again, has versatile uses. My favorite being as a dressing for a greek salad or for gyro. I usually can't eat this dip without pairing it with a soft pita bread and crumbled feta cheese... or shaved lamb meat, tomatoes, and kalamata olives... Yeah, I usually just make a salad or gyro with this as the dressing!

Tzatziki Sauce

Ingredients:

1 16 oz container greek yogurt
1 cucumber, peeled, seeded, and grated
1 clove garlic, minced
1 tbsp chopped fresh parsley
1 tbsp chopped fresh dill
1 tbsp fresh lemon juice
salt and pepper to taste

Directions:

1. Wrap grated cucumber in a few layers of paper towels. Squeeze to drain as much liquid from the cucumber as possible. 

2. in a medium mixing bowl, add the yogurt, fresh herbs, garlic, cucumber, lemon juice and salt and pepper. Mix until well combined. 

3. Cover and let refrigerate 3-4 hours to let flavors meld together before serving. Excellent with pita bread or use as a dressing for greek salads and gyros.

...................................................................................................................................................................


Thanks for dropping in today and checking out my salsa recipes! If you like these and want more recipes, visit my website @ Brandee's Basics. Enjoy!

Chipotle Chicken Pasta


Birds of a feather often flock together, and my being a foodie means that I have many friends that are amazing in the kitchen as well. This recipe was submitted on a food forum that I follow, Recipe 101, by a good friend of mine, Randy Dobson. I found the flavor profiles to be something of interest to me, so I want to share it with all of you.


The thing I like most about preparing pasta dishes is the versatility of the noodles. In this dish you could use any kind of noodle that you have in your cabinet and it would come out tasting amazing. Different noodles do hold different benefits, though. For example, using the bow tie pasta in this dish will help to hold more of the cheese and sauce in place so that you get a lot of flavor in each bite. Using large shells in dishes gives the ability to prepare a dish using the stuffing method, and thus changes the presentation. Spaghetti and angel hair noodles are delicate noodles and pair well with lighter sauces. Rigatoni noodles are hearty noodles and balance out  thick and hearty sauces. Options really are endless.


Moving on to sauces... The thing that I love most about this recipe is that it is literally macaroni and cheese! (Anyone who knows me knows that I am a lover of cheese... and now you all know that too!) This recipe has a grown up flavor to it with the added element of the Tobasco Chipotle sauce and the blend of cheeses. Like Randy had mentioned, you can add chicken to this recipe and make it a quick, easy, and delicious meal that will feed your family. Shrimp, scallops, or shredded pork might not be too bad with this either... see? Versatility. Pasta is a great ingredient to experiment with.


One last thing I want to ramble on about before we get to the recipe part of this blog, and that's the cooking methods. I am a big fan of baked pasta dishes because it adds an extra element to the dish by helping all the ingredients marry together more, and since I add extra cheese to the top of my dishes, I can broil it for the last few minutes to get the nice bubbling, browned, cheese crust on the top of it. It's not necessary to bake a dish though. If your pasta is cooked, and you pour some heated sauce on it, it will be awesomeness in a bowl just like that!


Drum roll please! Here is the recipe for Randy's most recent pasta creation. Enjoy!


Chipotle Chicken Pasta

Ingredients:

1 16 oz box bow tie pasta, cooked and drained
8 oz colby jack cheese, shredded, divided in half

4 oz Philadelphia cream cheese, room temperature
1 cup half-n-half cream
3 tbsp chili powder, divided
4 tbsp Chipotle Tobasco
1 chicken bouillon cube, crushed
4 tbsp corn starch
4 tbsp cool water
1/2 cup parmesan cheese for topping
Optional: 2 grilled chicken breast, cubed

Directions:

1.  Preheat oven to 350* (Optional. For alternative cooking method.) Bring 6 cups of water and a large pinch of salt to a boil in a large pot on the stove. Cook pasta according to package directions. Drain.

2. Shred the cheese and have the bouillon cube, cream cheese, half and half, 2 tbsp chili powder, and hot sauce pre-measured and ready to add to sauce. Mix corn starch with the cool water also and set aside.


3. In a medium sauce pan, over medium heat on the stove, melt 4 tbsp butter in the pan. Add the slurry of cornstarch and water and cook for 3 minutes. Mixture will be thick and doughy. Slowly stream the half and half into the pan and whisk constantly until mixture is smooth.


4. Bring mixture to a simmer over the medium heat, stirring constantly, and then lower heat to a simmer. Add the cream cheese and whisk until completely smooth before adding the chili powder, hot sauce, and bouillon cube. Mix thoroughly before adding 4 oz of the shredded cheese to the mixture. Let cheese melt completely. Remove from heat. If sauce is too thick, whisk in additional half and half until desired consistency is reached.


5. In a large bowl (or in the pot that the noodles were cooked in), gently fold the sauce into the noodles being careful not to break the noodles. Fold in cubed chicken (optional).


**At this point you can be done with the dish by sprinkling with extra chili powder and parmesan cheese and portioning into bowls. Continue on to step 6 for baking directions.


6. Pour pasta and sauce mixture into a lightly oiled 9x13 baking dish. Sprinkle with the remaining chili powder and parmesan cheese. Top with remaining 4 oz of shredded cheese. Bake in preheated oven, on the middle rack for 15 minutes. Turn oven on to high broil and broil for 2-3 minutes until cheese on the top gets bubbly and browned.


Serve hot. Serves 6.