Thursday, August 13, 2015

Roasted Stuffed Salmon


This dish is a particular treat if you have a big family, or a party of guests to serve. It's not the cheapest dinner to put together (these salmon filets can be kinda pricey), but, the dish is gorgeous and absolutely delicious. 


I bought this 2 pound beauty at Wholefoods for $32. The guys in the seafood department butterflied and skinned it for me which saved me time in the kitchen when it came to prepping this for the oven.  I was able to have this ready to roast in about 15 minutes and my guests were ecstatic that I chose to make this gorgeous fish for them. 


Roasted Stuffed Salmon


Serves 6-8


Ingredients:
1 (2-pound) center-cut boneless, skinless salmon fillet
1 cup crumbled feta cheese
1 cup ricotta cheese
1/2 teaspoon fine sea salt, divided
1/2 teaspoon ground black pepper, divided
1 tablespoon Dijon mustard
2 teaspoons extra-virgin olive oil, plus more for baking sheet
2 teaspoons chopped fresh dill
2 teaspoons chopped fresh oregano


Directions:
1. Preheat the oven to 450 F. Butterfly salmon fillet through the center, without cutting all the way through, so that it lays open flat in one large piece like a book. Turn salmon over so skinned side is facing up and place on a clean work surface. In a bowl, mash together feta and ricotta until well blended.


2. Season salmon with 1/4 teaspoon of the salt and 1/4 teaspoon of the pepper, then spread fillet with mustard. Arrange half of the spinach on top, leaving a 1–inch border around the edges. Evenly dot cheese mixture on top of spinach, then top with remaining spinach. Starting from one of the long sides, gently roll up salmon and tie snugly with cooking twine at 1-inch intervals.


3. Gently transfer salmon to an oiled baking sheet. Brush top and sides of salmon with oil and season with remaining ¼ teaspoon salt and ¼ teaspoon pepper. Scatter dill and oregano over top and sides. Roast until salmon is just cooked through, 15-20 minutes. Let rest for 5 minutes, then carefully transfer to a serving platter, remove and discard the twine and serve.


If you enjoy my recipe, like me on Facebook @ Brandee's Basics. Thanks for stopping by! 

Tuesday, August 11, 2015

Cherry Cream Cheese Coffee Cake


Here's a great brunch recipe that I started working on last week and was finally able to find the time to tweak the recipe to get it perfect. It is a perfect centerpiece for a brunch get together. The thing I love the most about the flavors, is that it is interchangeable with other pie fillings. If you're not a fan of cherry, try blueberry, raspberry, or even strawberry. I bet you could even use peach...


Not only is the flavor amazing in this cheesecake and coffeecake fusion, but it is an absolutely gorgeous presentation too! Make it the night before a brunch party and chill in the refrigerator over night. Then just take it out, let it come back to room temperature, and wow your guests.


Cherry Cream Cheese Coffee Cake


Prep: 25 min. Bake: 50 min. + cooling


Ingredients
2-1/4 cups all-purpose flour
3/4 cup sugar
3/4 cup cold butter, cubed
1/2 teaspoon baking powder
1/2 teaspoon baking soda
1/2 teaspoon salt
1 egg, lightly beaten
3/4 cup sour cream
1 teaspoon almond extract
FILLING:
1 package (8 ounces) cream cheese, softened
1/4 cup sugar
1 egg, lightly beaten
1 can (21 ounces) cherry pie filling
1/2 cup slivered almonds


Directions
1. In a large bowl, combine flour and sugar. Cut in butter until crumbly. Reserve ¾ cup crumb mixture. Add the baking powder, baking soda and salt to remaining crumb mixture. Stir in the egg, sour cream and almond extract until blended. Mixture will be thick and sticky. Press onto the bottom and 1 in. up the sides of an ungreased 9-in. springform pan with removable bottom. Tip: using a rubber spatula for this process reduces the mess!


2. For filling, in a large bowl, beat cream cheese and sugar for 1 minute. Add egg; beat just until combined. Spread over crust. Carefully top with pie filling. Sprinkle with reserved crumb mixture.


3. Bake at 350° for 50-60 minutes. Cool on a wire rack. Carefully run a knife around edge of pan to loosen; remove sides of pan. 


4. While cake is cooling, spread slivered almonds on a baking sheet in a single layer and broil on low, on the middle rack in the oven, until toasted, about 5 minutes. Keep a close eye on the almonds to ensure they don't burn. Let cool slightly, then pour evenly over the top of the cake. 


Store in the refrigerator. Freezing not recommended.


Yield: 8-10 servings.


If you enjoy my recipes, like me on Facebook @ Brandee's Basics. Thanks for stopping by!

Friday, August 7, 2015

Banana Poundcake with Cream Cheese Frosting


Once you try this banana poundcake, I promise you it will change how you see bananas. This. Cake. Is. So. Good.


I do have to say though, these cakes are very temperamental. There is a very delicate balance in the chemistry of this cake, and even a small misstep can cause the whole cake to fail miserably. It is very necessary to follow the directions very closely, or all the ingredients and the time and effort will be wasted.  


Tip #1: The recipe calls for a 10" tube pan. A tube pan is not the same as a bundt pan. Bundt pans hold less volume. If wanting to use a bundt, don't use all of the batter in the pan and scale back how long it stays in the oven for. To keep your oven clean, place pan on a baking sheet to catch any overflow of batter.


Tip #2: Use brand name ingredients when baking. Some store bought ingredients aren't as high of quality as needed to be for the recipe to be successful. 


Tip #3: Timing is important. When the recipe calls for beating the butter and sugar for 5-7 minutes, do exactly as it says. Skimping on the timing may be the reason the cake falls flat.


Tip #4: When baking, always leave the oven door closed. This keeps the heat trapped in the oven and allows for a more even heat so your cake will cook properly. Changes in temperature for opening and closing the oven door can and will cause your cake to fall flat.


So, now that we've gone over a few basic baking tips, let's get this amazing poundcake made!


Banana Poundcake with Cream Cheese Frosting 


Ingredients


3 teaspoons plus 3 cups sugar, divided 

1 cup butter, softened, room temperature (do not soften in the microwave)
1-1/2 teaspoons vanilla extract
½ teaspoon banana extract
3 cups all-purpose flour
¼ teaspoon baking soda
1 cup (8 ounces) sour cream
Toasted slivered almonds (for garnish, optional)

6 eggs

1 cup mashed ripe bananas (about 2 medium)


FROSTING 

8oz cream cheese, room temperature

1 -1/2 cups confectioners’ sugar
½ teaspoon vanilla extract
1/2 tsp banana flavor extract
3 to 4 teaspoons milk


Directions 

1. Grease a 10-in. fluted tube pan. Sprinkle with 3 teaspoons sugar; set aside. In a large mixing bowl, cream butter and remaining sugar until light and fluffy, about 5 minutes. Add eggs, one at a time, beating well after each addition. Stir in bananas and extracts. Combine flour and baking soda; add to the creamed mixture alternately with sour cream, beating just until combined.


2. In a small bowl, beat frosting ingredients on medium speed for 5 minutes, until it begins to look light and fluffy; spread over cooled cake. Store in the refrigerator. May be frozen for up to 1 month.


Yield: 12-15 servings.


Like my recipes? Follow me on Facebook @ Brandee's Basics. Thanks for stopping by!

Thursday, August 6, 2015

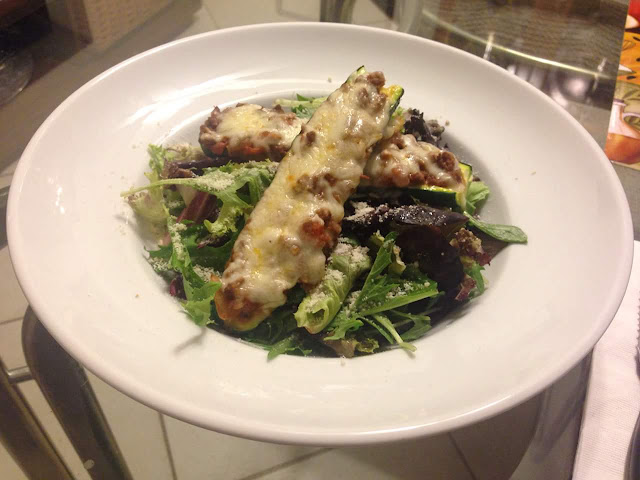
Roasted Garlic Cilantro Shrimp & Parmesan Crusted Zucchini Spears


#nationalzucchiniday is coming upon us and it's time to roll out another few of my favorite recipes. 


Zucchini is my favorite side to pair with seafood. It has a distinct flavor but isn't so overwhelming that it overpowers the delicate flavors of seafood. Then, pair it with a light side salad and you end up with a dish that's quick and easy to prepare, and somewhat healthy as well!


Shrimp with Roasted Garlic Cilantro Sauce


Prep time: 15 minsCook time: 16 minsTotal time: 31 minsServes 4


Ingredients
1.5 lb uncooked prawn
Salt and pepper
Olive oil
Roasted garlic-cilantro sauce:
1 small head garlic, top trimmed off
1 lime, juice of
1 cup chopped fresh cilantro leaves
3 tbsp olive oil
1 tbsp dry chili flakes


Directions:
1. Preheat your oven to 400 degrees P.


2. Peel, devein and rinse the shrimp. Pat dry and season with salt and pepper. Place the shrimp in the fridge until ready to cook.


3. Trim the top of the garlic off and drizzle with olive oil. Wrap in foil and roast in the oven until golden brown and fragrant, about 15 minutes. Let cool briefly then peel and crush the garlic finely.


4. In a small bowl, combine the roasted garlic, cilantro, lime juice, olive oil and chili flakes.


5. Lightly oil a cast iron skillet over medium heat. Dress the shrimp in olive oil and cook until done, aiming to get a slight crust on the shrimp. Remove from the skillet and dress in the garlic cilantro sauce. Serve immediately.


Parmesan Crusted Zucchini Spears


Prep time: 10 minutes
Ready in: 30 minutes
Serves: 8
Gluten-free and Vegetarian


Ingredients:
2 medium zucchini, washed and quartered into spears
3-4 tbsp olive oil
¼ cup freshly grated parmesan
2 tbsp fresh chopped basil
2 tbsp fresh chopped thyme
1 tbsp garlic powder
Salt and pepper to taste


Directions:
1. Preheat oven to 350*. Coat each spear with olive oil. Mix all other ingredients in a small bowl. Pat mixture onto each zucchini spear (not the bottoms).


2. Arrange spears in a 9x13 glass baking dish or baking sheet. Bake for 15 minutes.


3. Broil on high for 2-3 minutes to achieve golden brown crust. Serve hot.


BONUS!!!


Zucchini Bolognese


Prep time: 30 minutes
Ready in: 50 minutes
Serves: 4
Gluten-free


Ingredients:
4 medium zucchini, halved
1 lb lean ground beef (or turkey)
1 15 oz can petite diced tomatoes in tomato juice
3 cloves minced garlic
2 tbsp fresh minced parsley
2 tbsp fresh minced basil
2 tbsp fresh minced thyme
¼ cup freshly grated parmesan cheese
1 cup shredded mozzarella cheese
Salt and pepper to taste
Olive oil


Directions:
1. Preheat oven to 350*. Lightly coat a 9x13 glass casserole dish with olive oil. Scoop out seeds in center of each zucchini half. Drizzle with olive oil and salt and pepper to taste. Arrange in glass dish.


2. Brown ground beef (or turkey) in a medium saucepan over medium heat until cooked through. Drain canned tomatoes, reserving ¼ cup of juice. Add tomatoes, reserved juice, herbs, parmesan, and salt and pepper to meat. Reduce heat to low, cover and simmer about 10 minutes. Remove from heat.


3. Fill each zucchini boat with filling and top with mozzarella cheese. Bake for 15-18 minutes. Broil 2-3 minutes on high to get cheese to bubble. Serve hot.


If you like my recipes, come like my Facebook page @ Brandee's Basics. Thanks for stopping by!


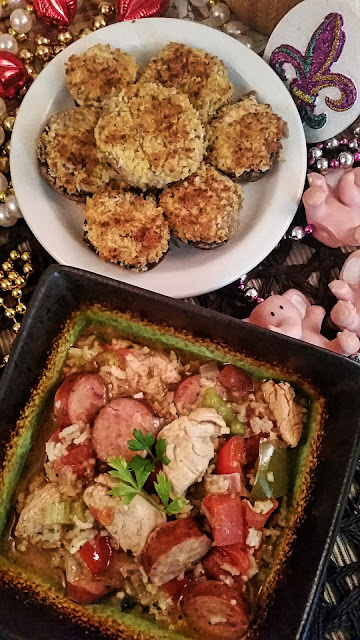
Andouille and Chicken Jambalaya and Chipotle Sausage Stuffed Mushrooms


I love the classic dishes of New Orleans cuisine. I have posted other recipes that channel creole flavors, and this jambalaya is another recipe that you have to try and then add it to your collection. It's so easy to make and just so good.


The stuffed baked mushrooms were actually a happy accident that got produced in my kitchen tonight. Ingredients that have bold flavors are among my favorites to experiment with. Since I had these beautiful baby portobello mushrooms in my fridge, with leftover chipotle peppers from the smoky chipotle chicken and cheddar wontons, and sausage left over from the sausage ravioli bake and I had to do something with them. So, why not throw them all in a bowl w some cream cheese and hope for the best?


I think the food fairies watch out for me because I rarely make a dish that isn't delicious. 


Chipotle Sausage Stuffed Mushrooms 


Ingredients 


Large carton (about 24 caps) of baby portobello mushrooms, washed, stems removed
8oz cream cheese, room temperature 
1 tbsp chipotle pepper in adobo, minced
2 tbsp sour cream
2 tbsp dried minced onion
1/2 lb mild ground pork sausage, cooked through 
1/2+ cup Panko bread crumbs
2 tbsp butter or margarine
1 tsp finely minced fresh parsley


Directions
1. Preheat oven to 375°F. Dry mushrooms w a paper towel and place them rounded side down on a baking sheet. 


2. In a skillet over medium heat, cook the sausage until cooked through. Remove from heat and let cool slightly.


3. In a medium bowl, beat the cream cheese, chipotle pepper, sour cream, and dried minced onion until light and fluffy, 5-7 minutes. In a small microwaveable dish, melt the butter. Add the panko bread crumbs and parsley to the butter. Mix to thoroughly coat.


4. Spoon just enough cream cheese mixture to fill each mushroom cap. Dip mushroom, cream cheese side down, into the bowl of buttered panko crumbs. Remove excess crumbs before replacing mushroom bavk on the baking sheet.


5. Bake mushrooms on a rack in the middle of the oven for 13-15 minutes and broil on high 2 minutes, or until bread crumbs are evenly browned. Serve immediately. 


And onward to the classic New Orleans dish... 


Andouille and Chicken Jambalaya! 


Ingredients 


1 large red onion, chopped 
1 large green peppers, chopped 
1 large red pepper, chopped
1 celery ribs, chopped 
4 garlic cloves, minced 
12 oz fully cooked andouille sausage, cut into ½-inch slices 
1 large boneless skinless chicken breast, cubed
3 cups chicken broth 
1 portioned bag (3 servings) instant long grain rice, cooked
1 can diced tomatoes, in tomato juice
1 tbsp worcestershire 
2 tbsp minced fresh parsley (for garnish)
1 tablespoon hot pepper sauce (optional)
tsp salt 
pepper 
Olive oil 


Directions
1. Pour 3 cups of chicken broth into a large 8 qt stock pot and turn on to medium heat on the stove.  In a large skillet, sauté onions, peppers, celery and garlic in olive oil until crisp-tender, about 5 minutes. Season with salt and pepper. Pour sautéed veggies into broth. Add the canned tomatoes and worcestershire. 


2. Cube chicken breast and sausage and coat with the blackening seasoning. In that same large skillet used to cook the veggies, cook the meat mixture  in 2 tbsp olive oil until chicken is cooked through, about 7-8 minutes, stirring occasionally. When cooked, add the mixture into stock pot with all the veggies.


3. Open the portioned bag of instant rice and add it to the stock pot, making sure to thoroughly saturate the rice in the liquid. Reduce heat, cover and simmer 10 minutes or until rice is done. Serve hot. Garnish with parsley and/or hot pepper sauce if desired. 
Serves 6-8


If you like my recipes, like me on Facebook @ Brandee's Basics. Thanks for stopping by!

x

Tuesday, August 4, 2015

Southwestern Sunrise Johnny Cake

I am a big fan of spicy foods, and I got in the kitchen just to play around w some different seasonings and textures. I have seen something like this somewhere before and wanted a reason to use my cast iron skillet. Enter the Southwestern Sunrise Johnny Cake. 


The 3 steps that go into making this fabulous cornbread are quick and easy. In 30 minutes, this goes from stove to table. Here's how to do it: 


Step 1: Blackening Seasoning 


Ingredients
1 tablespoon paprika
4 teaspoons dried parsley 
2 teaspoons onion powder
2 teaspoons garlic powder
2 teaspoons salt
1 1/2 teaspoons black pepper
1 teaspoon cayenne pepper, or to taste
1 teaspoon dried oregano
3/4 teaspoon ground cumin


Directions
1. In a small jar with a lid, combine the paprika, onion powder, garlic powder, salt, pepper, cayenne pepper, oregano, and cumin. Seal securely and shake vigorously to blend. Store in a cool dry place. Shake jar before each use.


Step 2: Sauté onions and peppers


Ingredients
1/4 red onion, thinly julienned 
1/2 jalapeño, seeded and thinly julienned 
1/4 green pepper, seeded and thinly julienned
Top of a red pepper, seeded and stem removed, sliced into bulbs
Olive oil
Salt and pepper


Directions 
1. Preheat skillet over medium heat with 2 tbsp olive oil. Add cut peppers and onions to pan and sauté until crisp-tender, about 5 minutes. Remove from heat.


Step 3: prepare cornbread for the oven.


Ingredients
1 6 oz box jiffy cornbread mix
1/3 cup milk
1 egg
3 tbsp blackening Seasoning mix (see above for recipe)
Sautéed peppers and onions


Directions
1. Preheat oven to 400°F. Oil the inside of a 10" cast iron skillet thoroughly. 


2. Mix cornbread with egg, milk, and seasoning. Pour into cast iron skillet, making sure it evenly coats the bottom of the pan. Top in any design you'd like with the peppers and onions.


3. Bake for 15-17 minutes or until edges begin to brown and a toothpick inserted near the center comes out clean. Serve warm. Tastes great with butter!


And that's it! Take pictures to show off your pepper designs and post them on my Facebook page @ Brandee's Basics
Thanks for stopping by!


Monday, August 3, 2015

Taco Bell: A Tribute


Taco Bell: you either love this place or you love this place.... there doesn't seem to be an in between. My favorite time for this guilty pleasure is at 3am on a Saturday morning when I'm unable to cook for myself without risking burning my house down.


Well, it used to be my favorite time to get me some Taco Bell.
Now, with all of the branded items they sell in the grocery stores, I can recreate these recipes at home... when I'm sober that is! I'll keep adding recipes to this blog as I make them to share with you all, because we all need a little Taco Bell in our lives.


So, there was a debate on my Facebook page on what item I recreated first. They guessed crunchwrap, encheritos, chalupas, and other items.... NOPE! (All great guesses though and thanks for the ideas for my next Taco Bell tribute recipes.)


The Mexican Pizza is one of my favorite offerings from Taco Bell. The crunchiness of the fried tortillas mixed with the flavors of an enchilada, in a tower of yumminess! How can you not love it?


So, here's how you can make it at home:


Taco Bell Style Mexican Pizza 


Ingredients:
1 lb ground beef
1 packet Taco Bell seasoning
1 14-15 oz can Taco Bell refried beans
1 12 oz can Taco Bell red enchilada sauce
1 cup shredded Mexican blend cheese
8- 4in flour tortillas
your choice of toppings, ex: tomatoes, green onions, olives, sour cream, salsa


Directions:
1. Preheat oven to 350 degrees. Heat 2 skillets over medium heat on the stove; one of them with an inch of canola oil in the pan. Also, in a small saucepan, heat refried bean through on low heat.


2. Brown ground beef in one skillet. Add in taco seasoning. Drain if needed. In the other skillet, fry each of the flour tortillas until slightly puffed and starting to turn golden brown, about 2 minutes, turning once.


3. Spray baking sheet with non stick cooking spray.  Lay one tortilla on sheet. Spread with beans, then, with meat. Cover with second tortilla. Bake for 10 minutes. Remove from oven. Spread top tortilla with sauce, then, top with cheese and desired toppings. Bake an additional 5-7 minutes or until cheese is melted completely. Cool slightly before cutting.
Makes 4 pizzas.

If you enjoy my recipes, like me on Facebook @ Brandee's Basics. Thanks for stopping by!


Firecracker Shrimp Tacos & Watermelon Salata


 I've come up with another keeper that I will be adding to my recipe collection. Since today is #nationalwatermelonday, I decided to try a few new flavors in a healthier, easy to make dinner. The dish has a brightness and tropical feel to it that reminds me of something I would order from a cantina or crab shack. 


Firecracker Shrimp Tacos


Ingredients

½ cup apricot preserves 

1 teaspoon canola oil 

1 teaspoon soy sauce 

½ teaspoon crushed red pepper flakes (or to taste)

1 pound uncooked large shrimp, peeled and deveined 

8-6" flour tortillas (soft taco size)
Canola oil (for frying)
3-4 cups romaine lettuce, chopped
4 oz crumbled feta cheese


Directions

1. Combine the apricot preserves, oil, soy sauce and pepper flakes in a 1 qt. Ziplock bag. Add the thawed, peeled and deveined shrimp to mix. Put in refrigerator until ready to cook. 


2. Heat 1" of canola oil in a 10" sauté pan over medium heat to 350°. When oil reaches temperature, fry each flour tortilla until puffy and starting to brown, about 2 minutes; turning halfway through. Fold tortilla into a taco shape directly after pulling from the oil and drain on paper towels. 


3. Take shrimp out of the fridge and cook in a preheated sauté pan over medium low heat until pink and cooked through, 3-4 minutes.


4. Add chopped lettuce evenly to each of the tortillas. Top with the shrimp and feta crumbles. Spoon any leftover sauce from the shrimp pan over the tacos. Serve immediately. 


Yield: 8 tacos/4 servings.


Watermelon Salsa 


Ingredients

4 cups chopped seeded watermelon 

2 tablespoons lime juice 

1 tablespoon finely chopped red onion 

1 tablespoon minced fresh cilantro 

2 teaspoons finely chopped jalapeno pepper 

1 /8 teaspoon salt 


Directions

1. In a large bowl, combine all ingredients. Cover and refrigerate for at least 1 hour before serving. Serve with a slotted spoon. 

Yields: 4 cups


Saturday, August 1, 2015

Chicken Tortilla Soup


I've read so many different recipes on how to make this soup, and this is by far the best one. This particular version of this soup tastes just like the chicken tortilla soup they serve at Chili's and is brought to you by Swanson who makes the best broths, in my opinion.


Save this recipe for your collection... you'll be happy you did.


Chicken Tortilla Soup 


INGREDIENTS
1 teaspoon canola oil
1 large onion, diced (about 1 cup)
2 large jalapeño peppers, seeded and chopped (about 1/2 cup)
2 tablespoons tomato paste
1/2 cup frozen whole kernel corn
1 cup black beans, rinsed and drained
1 can (14.5 ounces) diced tomatoes, undrained or 3 small tomatoes, diced
32 ounces (1 carton) Swanson® Mexican Tortilla Flavor Infused Broth
2 cups shredded cooked chicken
Mexican blend shredded cheese for garnish (optional)
Tortilla strips for garnish (optional)


DIRECTIONS
1 . Heat the oil in a 6-quart saucepot over medium-high heat.  Add the onion and peppers and cook for 2 minutes or until tender-crisp, stirring occasionally.


2 . Stir in the tomato paste, corn, beans, tomatoes, broth and chicken and heat to a boil.  Reduce the heat to low.  Cook for 5 minutes, stirring occasionally.  Serve topped with crushed tortilla chips or strips, if desired.


If you enjoy my recipes, follow me on Facebook @ Brandee's Basics. Thanks for stopping by!